
A roof penetration is any object that passes through the roof, which is the top covering of a building engineered to provide protection against rain, snow, sunlight, extremes of temperature, and wind. While essential for plumbing, ventilation, and other systems, every penetration is a calculated vulnerability. The integrity of the entire roofing system depends entirely on the precision with which these points are sealed. Failure is not an option. For meticulous homeowners who understand that chaos is the enemy of durability, mastering the science of roof penetration sealing is fundamental to protecting the structural and financial value of your property.
This is not a guide for finding the cheapest fix. If your primary objective is the lowest possible price, we are not the right contractor for you. Our process is designed for clients who recognize that a predictable, methodically executed project is the most logical and cost-effective path to long-term asset protection. We eliminate the chaos of vague timelines, surprise costs, and substandard work by operating with absolute transparency and precision.
Defining Roof Penetration Sealing: Ensuring Total System Integrity
Roof penetration sealing is the engineering practice of installing mechanical flashing and chemical sealants to make a roof system watertight at points where pipes, vents, or other constructions pass through its surface. The objective is to integrate these necessary breaches into the roof’s primary protective layer, preventing water ingress and preserving the building’s structural integrity. The system fails at its weakest point; for most roofs, these penetrations are that point.
The Primary Function of a Roof: Protection Against Rain, Snow, and Wind
A roof is a complete system, not just a layer of shingles. Its function is to be the building’s top covering, a barrier that provides absolute protection against weather. This includes shedding rainwater, supporting the weight of snow load, and resisting wind uplift forces. Every component, from the roof deck to the underlayment and the final roof covering, works in concert to maintain a continuous, unbroken shield. This shield is the building envelope’s first and most critical line of defense.
How Penetrations Compromise the ‘Top Covering’ of Your Building
Every penetration creates a discontinuity in the roof’s water-shedding surface. A plumbing vent, a skylight, or a chimney stack is an intentional interruption of the building envelope. These are unavoidable vulnerability points. Water does not seek a way in; it simply follows the path of least resistance. An improperly sealed penetration provides a direct channel for water intrusion past the roof covering, through the underlayment, and into the roof deck and building structure below. The risk is absolute and must be systematically mitigated.
The Financial and Structural Risks of Improper Sealing
The consequences of a failed penetration seal are severe and costly. Initial water intrusion saturates insulation, drastically reducing its thermal performance and increasing energy costs. Persistent moisture on the wooden roof deck and framing leads to structural rot, compromising the building’s stability. Inside the home, this moisture fosters toxic mold growth, creating a health hazard. The cost of repair is never limited to the roof itself; it often includes replacing drywall, insulation, and even structural framing. A small leak from a single failed pipe boot can escalate into tens of thousands of dollars in systemic damage. This is a financial risk that is entirely preventable with a methodical approach.
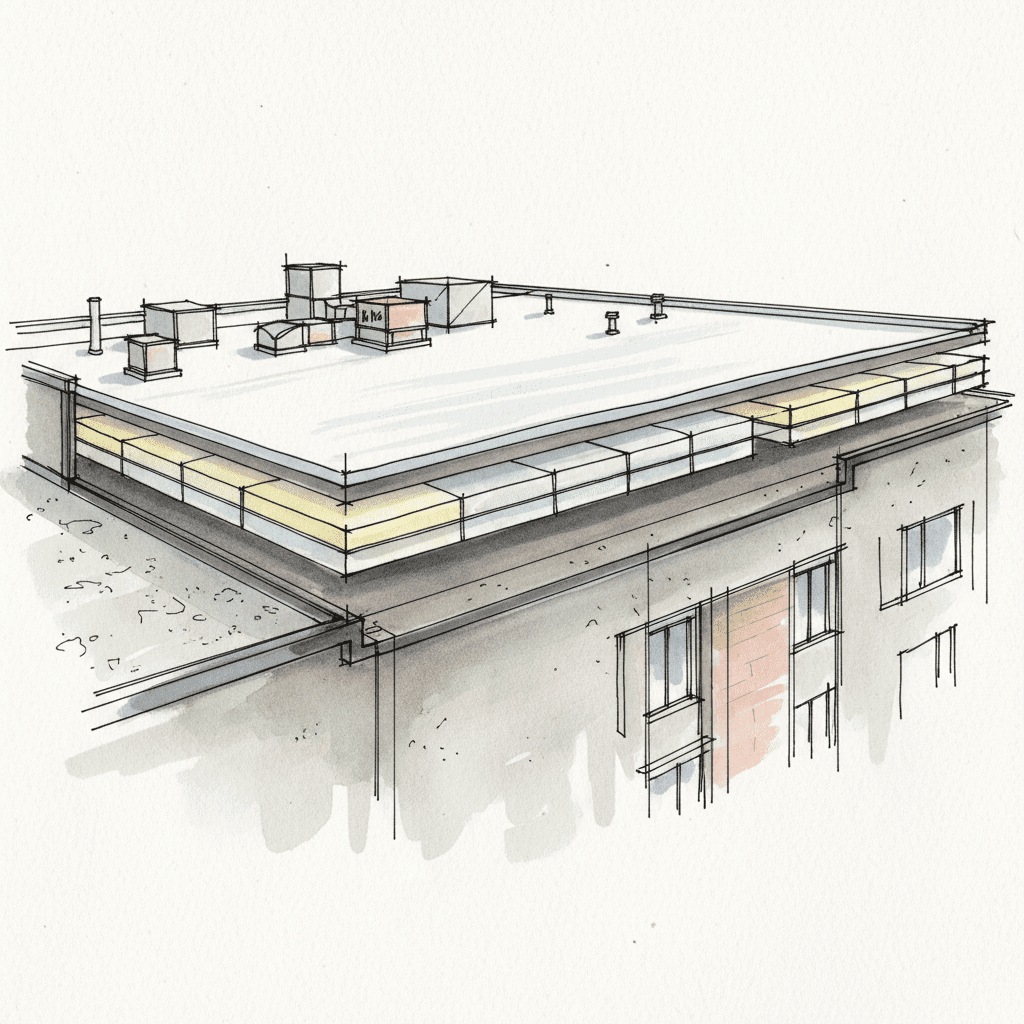
Systematic Classification of Common Roof Penetrations
A disciplined roofing project requires a precise classification of each penetration type, as each demands a specific set of materials and installation protocols. Grouping them by function and form allows for a systematic approach to sealing, ensuring that the correct engineered solution is applied every time.
Plumbing Vent Stacks: Code Requirements and Sealing Methods
Plumbing vent stacks are pipes that extend through the roof to regulate pressure in the plumbing system and allow sewer gases to escape. Building codes mandate their presence. Sealing these common penetrations is achieved using a component called a pipe boot or pipe collar. These consist of a metal or plastic flange and a flexible gasket (typically EPDM or silicone) that fits tightly around the pipe. The flange is integrated with the shingles, with the upper portion under the shingles and the lower portion over them, to ensure water is shed correctly. Silicone boots offer superior UV resistance and a longer service life compared to standard EPDM boots, making them a logical upgrade for long-term performance.
Attic and Exhaust Vents: Managing Airflow Without Compromising Protection
Roof ventilation is critical for controlling temperature and moisture in the attic space. This system requires intake vents (typically soffit vents) and exhaust vents. Common exhaust penetrations include box vents, ridge vents, and turbine vents. Each is a potential entry point for water. Sealing these involves a wide flange that is woven into the shingle layers, combined with high-performance sealant at all fastener heads. The primary goal is to allow air to escape while mechanically blocking or diverting rainwater, even in wind-driven conditions.
Skylights and Solar Mounts: Complex Constructions Demanding Precision
Skylights and solar panel mounts represent the most complex penetration types. They are not single points but large, multi-faceted constructions. Sealing requires a manufacturer-provided flashing kit that is specifically engineered for the unit. This includes step flashing along the sides, an apron flashing at the base, and a back-pan or cricket flashing at the top. Curb-mounted skylights are elevated on a wooden frame, which must also be fully wrapped in an ice and water shield before the flashing is installed. Solar stanchions, which support the racking, must be flashed and sealed with meticulous detail to prevent leaks at dozens of individual points. There is zero margin for error with these installations.
HVAC, Chimneys, and Flues: Sealing Against Extremes of Temperature
Chimneys, HVAC flues, and furnace exhausts introduce the additional variable of high temperature. Materials must be selected to withstand thermal expansion and contraction without degradation. The process involves a two-part flashing system. First, step flashing is woven into the shingles along the chimney’s sides. Second, counter-flashing, typically a metal strip embedded into the chimney’s mortar joints, is installed over the step flashing. This creates a durable, mechanical seal that moves with the structure. At the top of the chimney, a small, roof-like structure called a chimney cricket is required on wider chimneys to divert water around the structure, preventing pooling and inevitable ingress.
Material Science: Selecting the Correct Sealing Materials and Constructions
The long-term durability of a roof penetration seal is dictated by the physical properties of the materials used. Choosing the correct combination of mechanical flashing, chemical sealants, and membranes is not a matter of preference; it is a technical requirement based on the specific application, climate, and roofing materials.
Metal Flashing (Step, Counter, Apron): The First Line of Mechanical Defense
Flashing is a thin, impervious material used to direct water away from critical areas. It is a mechanical, not chemical, seal. It creates a physical barrier that channels water over and around a penetration and down the roof. The choice of metal is critical.
| Material | Corrosion Resistance | Lifespan | Considerations |
|---|---|---|---|
| Galvanized Steel | Good | 15-20 Years | Cost-effective but will eventually rust once coating is compromised. |
| Aluminum | Excellent | 30-40 Years | Lightweight and durable. Must not be placed in direct contact with mortar or treated wood. |
| Copper | Exceptional | 80-100+ Years | Highest performance and cost. Used for high-end and historical applications. Develops a protective patina. |
This mechanical water diversion is the primary seal. Sealants are secondary.
High-Performance Sealants: Polyurethane vs. Silicone Specifications
Sealants are used to seal small gaps, seams, and fastener heads, acting as a secondary defense. They are not a substitute for proper mechanical flashing. The two primary chemistries used in roofing are polyurethane and silicone.
| Property | Polyurethane Sealant | Silicone Sealant |
|---|---|---|
| UV Resistance | Good (can yellow over time) | Excellent (maintains color and flexibility) |
| Adhesion | Excellent adhesion to porous surfaces like wood and masonry. | Excellent adhesion to non-porous surfaces like metal and vinyl. |
| Flexibility | Very good; highly tear-resistant. | Exceptional; remains flexible across a wide temperature range. |
| Paintable | Yes | No |
Selecting the right sealant requires analyzing the substrates it must adhere to and the expected exposure to sunlight and thermal cycling. Using the wrong type guarantees premature failure.
Ice & Water Shield: Critical Underlayment for Protection from Snow and Ice Dams
An ice and water shield is a self-adhered membrane made from modified bitumen. It is a critical underlayment applied directly to the roof deck around all penetrations, in valleys, and along eaves. Its purpose is to provide a final, waterproof barrier if water gets past the shingles and flashing, particularly during ice damming events. The membrane’s sticky nature seals around the shanks of roofing nails, preventing leaks at these fastener points. This is a non-negotiable component for any high-risk area of the roof.
Failure Mode Analysis: Identifying and Diagnosing Failed Seals
A systematic process for identifying failed seals is crucial for preventative maintenance and effective repair. Failures are predictable and almost always result from material degradation, thermal cycling, or improper installation. Recognizing the early warning signs allows for targeted intervention before minor issues cause major structural damage.
Visual Inspection Checklist: Cracking, Deterioration, and Gaps
A disciplined visual inspection can identify most potential failures. The process involves examining each penetration for specific defects:
- Cracked Sealant: Look for brittle, cracked caulk or sealant around flashing edges. This indicates the material has lost its flexibility and is no longer watertight.
- Corroded Flashing: Inspect metal flashing for signs of rust or corrosion, which can create pinholes and compromise the mechanical barrier.
- Deteriorated Gasket: Check the rubber gasket on pipe boots for cracking, splitting, or shrinking away from the pipe. This is a common failure point.
- Nail Pops: Look for nails that have lifted or ‘popped’ through the shingles, creating a direct path for water. This often happens near penetrations due to thermal movement.
- Gaps and Misalignment: Ensure all flashing components are seated tightly against the roof and the penetration with no visible gaps.
Impact of Sunlight and Thermal Cycling on Sealant Lifespan
No material lasts forever. The primary drivers of degradation are UV radiation from sunlight and thermal cycling (the daily expansion and contraction of materials due to temperature changes). UV radiation breaks down the chemical bonds in sealants and gaskets, making them brittle. Thermal cycling causes movement between different materials (e.g., a metal flashing and a wood deck), which puts constant stress on sealant joints. A material’s service life is a direct function of its ability to withstand these forces. Preventative maintenance and inspection are essential because material failure is an inevitability, not a possibility.
The ‘Messy Contractor’ Problem: Consequences of Rushed Installation
The single greatest cause of premature seal failure is improper installation. This is the chaotic process that defines the standard roofing industry experience. It includes using substandard materials to cut costs, applying sealant to dirty or wet surfaces, failing to integrate flashing correctly with shingle courses, and using excessive amounts of caulk as a primary seal instead of a secondary one. This approach, born from a focus on speed and low cost, creates hidden damage that may not become apparent for years. It often voids material warranties and always leads to a costly, premature failure. It is the direct result of choosing a contractor based on the lowest bid.
The Methodical Approach: Our Predictable Process for Roof Penetration Sealing
We reject the industry’s standard of chaos. Our value is not in being the cheapest option; it is in providing a predictable, stress-free process that guarantees a durable, long-term outcome. This is achieved through a rigid, step-by-step methodology that leaves no detail to chance. We believe this is the only sane way to manage a critical home construction project.
Why We Reject ‘Quick Fixes’: A Commitment to Long-Term Protection
Applying a tube of roofing cement over a failed seal is not a repair; it is a temporary patch that masks an underlying problem. We reject this approach. A true solution is an engineered one that addresses the root cause of the failure. This often means removing shingles, replacing the failed flashing and underlayment with superior materials, and reinstalling all components according to manufacturer specifications and best practices. This commitment to quality assurance provides long-term value and durability. It costs more upfront because it is designed to be done correctly, once.
Our Step-by-Step Sealing Protocol: From System Diagnosis to Final Sign-Off
Predictability is the core of our service. Our process is documented, transparent, and executed the same way on every project. It transforms a chaotic home repair into a managed project.
Transparent Pricing: A Detailed Scope of Work, Not a Vague Estimate
We provide a fixed-price proposal based on a highly detailed scope of work. You will see a line-item breakdown of the materials and labor required to complete your project correctly. There are no hidden fees or surprise charges. This clarity eliminates the financial anxiety common in home improvement projects. It allows you to make an informed decision based on a complete understanding of the work to be performed and the total investment required. Our clients value this predictability above all else.